생명주기
UI에 있어서 생명주기(Lifecycle)는 어떤 뷰가 보여지고 사라지는 일련의 과정을 뜻한다.
클라이언트 개발은 그 생명주기 사이사이에 맞는 코드를 넣어야 하기 때문에 뷰의 생명주기의 순서와 의미를 이해하는 것이 중요하다.
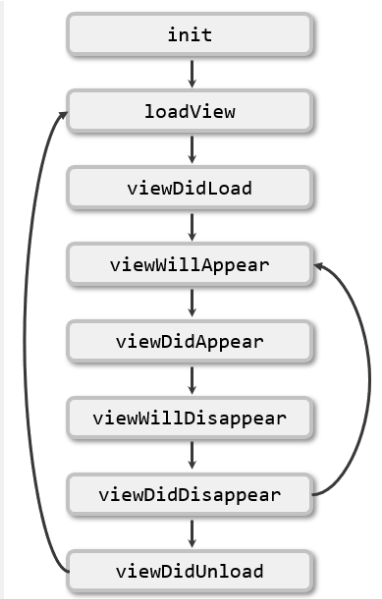
도식은 아래와 같다. init은 생성자이며 loadView는 애플 공식문서에 따르면 직접 호출하면 안되고 iOS 프레임워크가 실행해줘야 한다.
또 viewDidUnload는 deprecated 되었다.
Lifecycle
viewDidLoad
nib파일이든 프로그래머틱 UI 생성이든 만들어진 뷰가 로드한 뒤에 한 번만 호출된다.
viewWillAppear
뷰가 나타나기 전에 호출된다.
viewDidAppear
뷰가 나타난 다음에 호출 된다.
viewWillDisappear
뷰가 사라지기 전에 호출 된다.
viewDidDisappear
뷰가 사라진 후에 호출 된다.
그러면 이제 코드로 라이프사이클이 실제 어떻게 동작하는지 보자.
코드
//
//  ViewController.swift
//  UIKItPlayground
//
//

import UIKit


class ViewController: UIViewController {

    private let nextButton: UIButton = {
        let button = UIButton()
        button.setTitleColor(.systemBlue, for: .normal)
        button.setTitle("To Second VC", for: .normal)
        return button
    }()

    @objc func didTapNext() {
        let vc = SecondViewController()
        navigationController?.pushViewController(vc, animated: true)
    }

    override func viewDidLayoutSubviews() {
        super.viewDidLayoutSubviews()
        print("Main VC ViewDidLayoutSubViews")
        nextButton.frame = CGRect(
            x: (view.frame.width - 200) / 2,
            y: (view.frame.height-50) / 2,
            width: 200,
            height: 50)
    }

    override func viewDidLoad() {
        super.viewDidLoad()
        view.addSubview(nextButton)
        nextButton.addTarget(self, action: #selector(didTapNext), for: .touchUpInside)
        print("Main VC ViewDidLoad")
    }

    override func viewWillAppear(_ animated: Bool) {
        super.viewWillAppear(animated)
        print("Main VC ViewWillAppear")
    }

    override func viewDidAppear(_ animated: Bool) {
        super.viewDidAppear(animated)
        print("Main VC ViewDidAppear")
    }

    override func viewWillDisappear(_ animated: Bool) {
        super.viewWillDisappear(animated)
        print("Main VC ViewWillDisappear")
    }

    override func viewDidDisappear(_ animated: Bool) {
        super.viewDidDisappear(animated)
        print("Main VC ViewDidDisappear")
    }
}
//
// SecondViewController.swift
// UIKItPlayground
//
import UIKit
class SecondViewController: UIViewController {
override func viewDidLoad() {
super.viewDidLoad()
print("Second VC ViewDidLoad")
}
override func viewWillAppear(_ animated: Bool) {
super.viewWillAppear(animated)
print("Second VC ViewWillAppear")
}
override func viewDidAppear(_ animated: Bool) {
super.viewDidAppear(animated)
print("Second VC ViewDidAppear")
}
override func viewWillDisappear(_ animated: Bool) {
super.viewWillDisappear(animated)
print("Second VC ViewWillDisappear")
}
override func viewDidDisappear(_ animated: Bool) {
super.viewDidDisappear(animated)
print("Second VC ViewDidDisappear")
}
}이렇게 두 개의 뷰컨트롤러를 작성하고 기본 뷰 컨트롤러에서 SecondViewController로 이동하는 버튼을 만들어준다.
그리고 각각 라이프사이클 메소드가 잘 실행되는지 print문을 넣어준다.
중간에 viewDidLayoutSubView 도 넣었는데, 뷰 내의 서브뷰를 그릴 때 자주 사용하게 되는 메소드이므로 추가해주었다. 여기서 뷰 컨트롤러 내의 서브뷰의 위치를 지정해줄 수 있다.
//
//  SceneDelegate.swift
//  UIKItPlayground
//

import UIKit

class SceneDelegate: UIResponder, UIWindowSceneDelegate {

    var window: UIWindow?

    func scene(_ scene: UIScene, willConnectTo session: UISceneSession, options connectionOptions: UIScene.ConnectionOptions) {
        // Use this method to optionally configure and attach the UIWindow `window` to the provided UIWindowScene `scene`.
        // If using a storyboard, the `window` property will automatically be initialized and attached to the scene.
        // This delegate does not imply the connecting scene or session are new (see `application:configurationForConnectingSceneSession` instead).
        guard let windowScene = (scene as? UIWindowScene) else { return }
        window = UIWindow(frame: windowScene.coordinateSpace.bounds)
        window?.windowScene = windowScene
        window?.rootViewController = UINavigationController(rootViewController: ViewController())
        window?.makeKeyAndVisible()
    }

    func sceneDidDisconnect(_ scene: UIScene) {
        // Called as the scene is being released by the system.
        // This occurs shortly after the scene enters the background, or when its session is discarded.
        // Release any resources associated with this scene that can be re-created the next time the scene connects.
        // The scene may re-connect later, as its session was not necessarily discarded (see `application:didDiscardSceneSessions` instead).
    }

    func sceneDidBecomeActive(_ scene: UIScene) {
        // Called when the scene has moved from an inactive state to an active state.
        // Use this method to restart any tasks that were paused (or not yet started) when the scene was inactive.
    }

    func sceneWillResignActive(_ scene: UIScene) {
        // Called when the scene will move from an active state to an inactive state.
        // This may occur due to temporary interruptions (ex. an incoming phone call).
    }

    func sceneWillEnterForeground(_ scene: UIScene) {
        // Called as the scene transitions from the background to the foreground.
        // Use this method to undo the changes made on entering the background.
    }

    func sceneDidEnterBackground(_ scene: UIScene) {
        // Called as the scene transitions from the foreground to the background.
        // Use this method to save data, release shared resources, and store enough scene-specific state information
        // to restore the scene back to its current state.
    }
}
또 네비게이션 컨트롤러를 사용할 수 있도록 SceneDelegate 설정도 해준다.
ViewController
먼저 앱을 실행하면 다음과 같이 라이프사이클이 출력된다.
Main VC ViewDidLoad
Main VC ViewWillAppear
Main VC ViewDidLayoutSubViews
Main VC ViewDidAppear
뷰가 로드가 완료되어 보여질 준비가 된 후 -> 뷰가 보인다는 것을 나타내고 -> 서브뷰의 위치를 조정한 후 -> 뷰를 보여준다.
이렇게 하면 위의 도식과 같이 라이프 사이클이 동작하는 것을 볼 수 있다.
이제 버튼을 눌러서 SecondViewController로 이동해 보자.
SecondViewController
Second VC ViewDidLoad
Main VC ViewWillDisappear
Second VC ViewWillAppear
Main VC ViewDidDisappear
Second VC ViewDidAppear
세컨드 뷰를 로드하고 -> 이전 뷰컨트롤러가 사라진다는 것을 알려주고 -> 세컨드 뷰 컨트롤러가 보여진다는 것을 알려주고 -> 이전 뷰 컨트롤러를 사라지게 하고 -> 세컨드 뷰 컨트롤러를 보여준다.
논리적으로 맞는 순서대로 라이프 사이클이 동작하는 것을 알 수 있다.
이제 다시 네비게이션 바의 백버튼을 눌러 이전 컨트롤러로 돌아가보자
Second VC ViewWillDisappear
Main VC ViewWillAppear
Second VC ViewDidDisappear
Main VC ViewDidAppear
위처럼 이전 뷰컨트롤러가 사라짐을 먼저 예고하고 다음 뷰컨트롤러를 보여준다.
여기서 주요하게 볼 점은 viewDidLoad는 양쪽 컨트롤러 전부 한 번씩만 호출된다는 것을 볼 수 있다.
그렇다면 화면이 띄워질 때 한번만 실행할 것은 viewDidLoad에 넣으면 될 것이고viewWillAppear, viewDidAppear에는 화면이 보여질 때 매번 실행할 것들viewWillDisappear, viewDidDisappear에는 화면이 사라질 때 매번 실행할 코드들을 작성하면 된다는 것을 알 수 있다.
홈 버튼
이제 여기서 홈버튼을 눌러서 홈으로 나가보자. 그러면 viewDidLayoutSubView는 호출되지만 다른 메소드는 호출되지 않는 것을 볼 수 있다.
즉 앱이 포어그라운드, 백그라운드로 갈 때는 viewController의 기본적인 생명 주기 라이프사이클은 동작하지 않는 다는 것을 알면 된다.
viewDidLayoutSubView가 호출되는 이유는 홈으로 돌아가는 과정에서 앱의 화면 크기, 상태바 등이 변경될 수 있기 때문에 호출되는 것이다.
앱 종료
이제 앱을 종료시키면 아래와 같이 뷰 컨트롤러가 사라진다는 것을 알 수 있다. 앱 종료 이전에 뭔가 현재 상태를 로컬에 저장하거나 API를 호출 하고 싶으면 이 곳에서 하면 될것으로 보인다.
Main VC ViewWillDisappear
Main VC ViewDidDisappear